Your Cart is Empty

Drying Metal Clay - Best Practices
3 min read
One of the basic elements included in any metal clay tool kit is the cup warmer or hot plate. Used to speed-up the drying time, this is a very common practice, especially when someone is looking to reduce production time.
But is this optimal?
Even if you are working with single layer creations, there is still the risk of unexpected firing results such as;
-
Warping / deformation
-
Holes / pits appearing on the surface
-
Cracking
-
Breakage
When you are working with multiple layers or clay intensive complex designs, these results can lead to a total loss of your creation. Not only that, but it can also become very dangerous when firing with Alumina Hydrate if water is present in the piece when firing - it can literally explode!.
These issues are caused when either we try to dry the piece too quickly or the piece is not fully dried. In the words of Rodi:
Warping is the deformation process of the clay when exposed to heat. This is due to the presence of organic particles whos' molecules change their spatial structure when heated, like an egg when fried. This is why I recommend drying "low & slow".
So how do we minimize the risk?
One way is to use a dehydrator. This is a great option if you create multiple pieces at a time, but can be expensive to purchase and operate. The main advantage a dehydrator offers is the ability to control the amount of heat and airflow. One of the highly recommended dehydrators commonly used by metal clay instructors and artists is the Excalibur 2400 4-Tray Economy Dehydrator.
Another much less expensive way is to use a rheostat (a rheo-WHAT? don't worry, no electricians hat is required ;-) to reduce the heat when using a cup warmer.

Although the following can also apply to hot plates, there is no assurance depending on the model. But most common hot plates should work, and as the investment is very low even if your model of hot plate does not work you can still use it for it's original purpose, a table lamp.
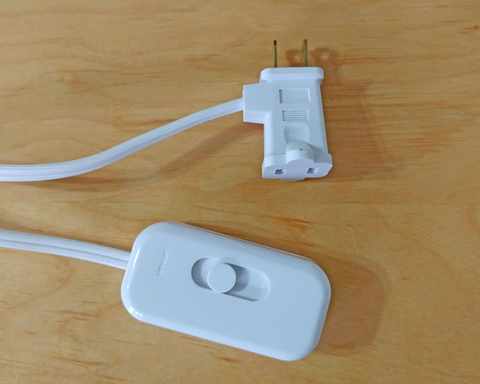
The easiest way to add a rheostat is with an inexpensive table lamp dimmer. The Lutron Credenza Plug-In Dimmer for Halogen and Incandescent Bulbs, for example is around $12 at the time of writing.
Outside North America, make sure that you purchase this product with your local plug already attached - do not use a plug adapter or modify the plug unless you understand the electrical rating and it's compatibility with your local electrical currents. You definitely need an electricians hat for this, and certification to avoid burning down your house.
Simply plug the dimmer into your outlet and plug your cup warmer into the dimmer outlet (see no electrical skills required :-). Now you can reduce the base heat of your cup warmer! Reduce the heat to the minimum and allow your pieces to dry for 2 - 3 hours, turning your piece over each 15 - 20 mins.
To achieve similar results without the rheostat:
AIR DRY: Always (not the type of always that takes second place to "I'm in a hurry!") let your pieces dry naturally at room temperature for 2 - 3 hours BEFORE placing on the cup warmer. Place on your cup warmer for 15 - 20 mins. or until the entire surface of your clay is a consistent light color (no dark spots).
Letting your pieces dry overnight before firing will also go a long way in minimizing warping and reduce the risk of total loss when firing with Alumina Hydrate. So remember;
"Low & Slow" is the way to go!
Have a question? get the answer by posting in our Facebook Group
Leave a comment
Comments will be approved before showing up.
